copyparty with Docker: a one-file file server with resumable uploads and WebDAV (Linux, Windows, Mac)
Before you start
- 21 min read
Boxes marked Run in terminal are what you type; plain text explains why. Check what you need first
What you get in one minute#
copyparty is a free file server that shows a folder you already have in any web browser, with resumable uploads, accounts, search and WebDAV, from a single Python program or one Docker container.

Logo: the official copyparty project (github.com/9001/copyparty)
You point it at a folder, and the files stay ordinary files on your disk. There is no database server and nothing to import. It suits a drop box for large files, reaching NAS folders from a phone, or a drive you mount from Windows, Mac or Linux. It is not a Nextcloud replacement; the comparison below says where each wins.
One warning first. The default setup shares the folder read-write with anyone who can reach the port. This guide sets accounts before you start the container.
| What | Value (official docs, read November 2026) |
|---|---|
| Current version | v1.20.26, released 14 October 2026 (GitHub release page, UTC) |
| Image to pin | copyparty/ac:1.20.26 (tag checked on Docker Hub, six CPU architectures) |
| Time needed | About 15 minutes (our estimate, not measured) |
| Size | ac image: 163 MiB installed, 56 MiB compressed (project's figures). RAM: not documented |
| Ports | TCP 3923 (web and WebDAV). FTP, SFTP and others are off until you enable them |
| Licence | MIT (LICENSE at the release tag) |
| Official docs | github.com/9001/copyparty and the Docker README |
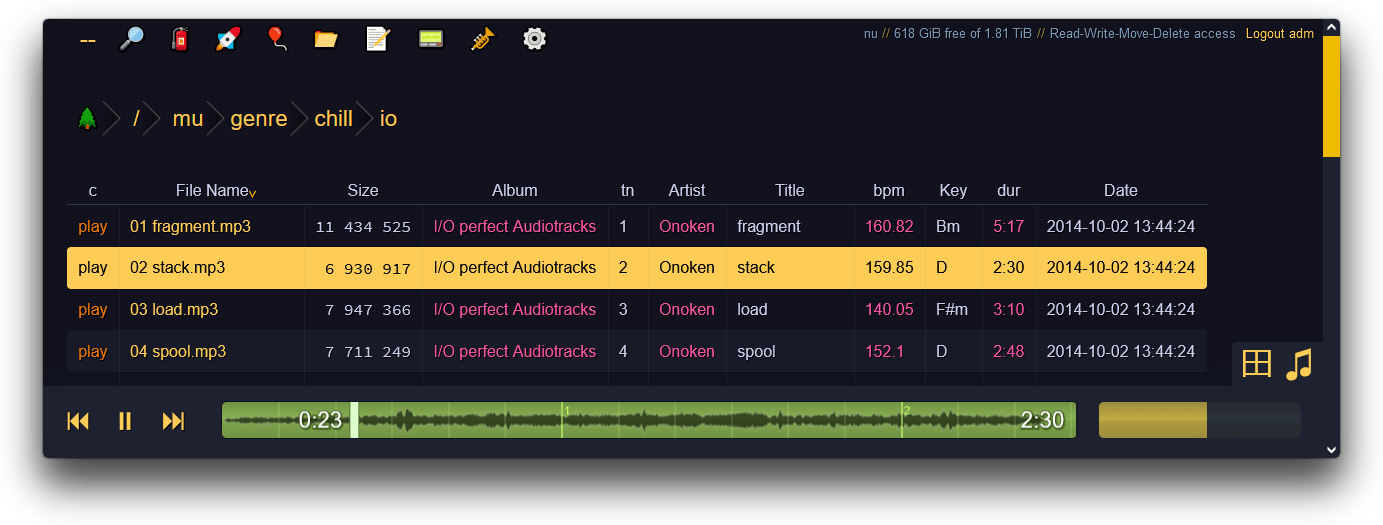
Image: the official copyparty project (README, "the browser")
At a glance:
- What it is: a file server for folders you already have. Files stay normal files on disk.
- Uploads: drag in files or whole folders; interrupted uploads resume, even after a reboot, with no size limit.
- Protocols: browser and WebDAV on port 3923. FTP, SFTP, TFTP and SMB are off by default.
- Accounts: a config file with users and per-folder permissions. Write it before the first start.
- Not included: no native OIDC login (identity-provider headers only), no two-way sync, no calendar or office suite.
- Platforms: Linux with Docker is the main route; Windows and Mac use Docker Desktop or run it natively.
- Privacy: no telemetry is described; the optional version checker contacts a feed you choose.
How it fits together#
Your devices talk to one container on port 3923. It uses one shared folder and keeps settings and search index in another.

Drawn for this guide from the official Docker README. The HTTPS front door (dashed) is optional.
Before you start#
You need Docker with Compose and a folder to share. The official images exist for amd64, arm64, 32-bit ARM, 386, ppc64le and s390x. The ac image runs on all of them; iv and dj skip 32-bit ARM, ppc64le and s390x.
Linux: a server you manage, curl, and Docker Engine with the Compose plugin.
docker --version
docker compose version
id -u && id -g
Windows: Docker Desktop (WSL2 backend) running. The project's docs do not cover it; these steps are our adaptation.
docker --version
docker compose version
Mac: Docker Desktop running (Intel or Apple Silicon).
docker --version
docker compose version
Checklist:
- [ ] Docker and Compose print versions
- [ ] Port 3923 is free (
docker psshows nothing else using it) - [ ] You know which folder to share and it is backed up
- [ ] Two long passwords chosen (one admin, one read-only)
- [ ] For the HTTPS section only: a domain with a DNS record, and ports 80 and 443 free
Tested on 2026-11-16: Linux = not run, Windows = not run, Mac = not run. Commands come from the official docs; the Docker Desktop steps are not in the project's docs.
Step 1: Create the folders#
Everything lives under ~/docker_volumes/copyparty: config for settings and index, data for the shared files, backups for archives.
Linux#
mkdir -p ~/docker_volumes/copyparty/{config,data,backups}
cd ~/docker_volumes/copyparty
Windows (PowerShell)#
$base = "$HOME\docker_volumes\copyparty"
New-Item -ItemType Directory -Force "$base\config", "$base\data", "$base\backups" | Out-Null
Set-Location $base
Mac (Terminal)#
Same commands as Linux:
mkdir -p ~/docker_volumes/copyparty/{config,data,backups}
cd ~/docker_volumes/copyparty
Check it worked. The three folders exist (ls on Linux and Mac, Get-ChildItem on Windows).
Tip: To share a folder you already have, mount it as
/win Step 3 instead of the emptydatafolder. Remember that every account with delete permission can delete files in it.
Step 2: Write the config with accounts#
copyparty reads every file ending in .conf from /cfg. Here you create two accounts and one volume: alice can read, write, move, delete and administer; bob can only read. Anyone not logged in gets nothing.
First make two passwords. The server finds the account from the password alone, so give each account a different one.
Linux#
openssl rand -hex 16
openssl rand -hex 16
Save both in a password manager, then write the file (replace the two placeholders):
cat > ~/docker_volumes/copyparty/config/copyparty.conf << 'EOF'
[global]
  e2dsa             # index all files (search, upload undo, deduplication)
  e2ts              # index audio and video tags
  hist: /cfg/hists  # keep the index and thumbnails here, not inside your folders

[accounts]
  alice: <ALICE_PASSWORD>
  bob: <BOB_PASSWORD>

[/]
  /w
  accs:
    rwmda: alice    # read, write, move, delete, admin
    r: bob          # read only
EOF
Windows (PowerShell)#
$b = New-Object byte[] 16; [Security.Cryptography.RandomNumberGenerator]::Create().GetBytes($b); ([BitConverter]::ToString($b) -replace '-','').ToLower()
Run that twice and save both values. Then write the file. This writes UTF-8 without a byte-order mark and with Unix line endings, which keeps the config parser happy (our precaution, not from the docs):
$conf = @'
[global]
  e2dsa             # index all files (search, upload undo, deduplication)
  e2ts              # index audio and video tags
  hist: /cfg/hists  # keep the index and thumbnails here, not inside your folders

[accounts]
  alice: <ALICE_PASSWORD>
  bob: <BOB_PASSWORD>

[/]
  /w
  accs:
    rwmda: alice    # read, write, move, delete, admin
    r: bob          # read only
'@
[IO.File]::WriteAllText("$HOME\docker_volumes\copyparty\config\copyparty.conf", $conf.Replace("`r`n","`n"))
Mac (Terminal)#
Same commands as Linux (macOS includes openssl).
Check it worked. The file exists and holds your passwords, not the placeholders: cat ~/docker_volumes/copyparty/config/copyparty.conf (Windows: Get-Content $HOME\docker_volumes\copyparty\config\copyparty.conf).
Rules from the docs: a comment needs two spaces before the #, and the name must end in .conf. Permissions: r read, w upload, m move out, d delete, a admin, A all of those, g download by exact URL only.
Tip: Stick to letters and digits in passwords, as
openssl rand -hexgives;#,:or spaces can confuse config files and WebDAV clients (our precaution).
Step 3: Write the Compose file and start copyparty#
This follows the project's own example with the image pinned. The :z flags in that example are for SELinux hosts; add :z to both volumes only on Fedora, RHEL and similar.
Linux#
If id -u printed something other than 1000, put your own uid:gid in user: so the container can write to your folders.
cd ~/docker_volumes/copyparty
cat > docker-compose.yml << 'EOF'
services:
  copyparty:
    image: copyparty/ac:1.20.26
    container_name: copyparty
    restart: unless-stopped
    user: "1000:1000"
    ports:
      - "3923:3923"
    volumes:
      - ./config:/cfg
      - ./data:/w
    environment:
      PYTHONUNBUFFERED: 1
    stop_grace_period: 15s
    healthcheck:
      test: ["CMD-SHELL", "wget --spider -q 127.0.0.1:3923/?reset=/._"]
      interval: 1m
      timeout: 2s
      retries: 5
      start_period: 15s
EOF
docker compose up -d
docker compose ps
docker compose logs --tail=40 copyparty
Windows (PowerShell)#
Set-Location "$HOME\docker_volumes\copyparty"
$compose = @'
services:
  copyparty:
    image: copyparty/ac:1.20.26
    container_name: copyparty
    restart: unless-stopped
    user: "1000:1000"
    ports:
      - "3923:3923"
    volumes:
      - ./config:/cfg
      - ./data:/w
    environment:
      PYTHONUNBUFFERED: 1
    stop_grace_period: 15s
    healthcheck:
      test: ["CMD-SHELL", "wget --spider -q 127.0.0.1:3923/?reset=/._"]
      interval: 1m
      timeout: 2s
      retries: 5
      start_period: 15s
'@
[IO.File]::WriteAllText("$PWD\docker-compose.yml", $compose.Replace("`r`n","`n"))
docker compose up -d
docker compose ps
docker compose logs --tail=40 copyparty
Mac (Terminal)#
Same commands as Linux. Keep user: "1000:1000"; Docker Desktop maps file ownership itself (not tested by us).
Check it worked. docker compose ps shows copyparty running and, within about a minute, healthy. The first log lines name the version. A user report for 1.20.26 shows copyparty v1.20.26 "sftp is fine too" (2026-10-14) (issue #1706); the project documents no fixed log text.
Tip: Docker publishes ports around
ufwand similar firewalls, so"3923:3923"is open to your whole network. Use"127.0.0.1:3923:3923"if only a reverse proxy on the same machine should reach it.
Step 4: Log in and prove it is locked#
Open http://localhost:3923 on the server, or http://<server-ip>:3923 from another device.
Linux#
- In a private browser window you must see a login prompt, not your files.
- Log in as alice with her password. Upload and file-manager controls appear.
- Upload with curl (the trailing slash keeps the file name):
echo "hello from copyparty" > hello.txt
curl -H "pw: <ALICE_PASSWORD>" -T hello.txt http://127.0.0.1:3923/
ls ~/docker_volumes/copyparty/data
Windows (PowerShell)#
Use curl.exe; plain curl is a PowerShell alias for another command.
"hello from copyparty" | Out-File hello.txt -Encoding ascii
curl.exe -H "pw: <ALICE_PASSWORD>" -T hello.txt http://127.0.0.1:3923/
Get-ChildItem "$HOME\docker_volumes\copyparty\data"
Mac (Terminal)#
Same commands as Linux.
Check it worked. hello.txt appears in the data folder. Log in as bob: he sees the file but has no upload or delete. A private window without login shows no files. If it does show files, your config was not loaded: see Common mistakes.
Tip: Drag a large file into the page, close the tab midway, reopen it and drop the same file again. It resumes. That is the feature that sets copyparty apart.
Step 5: Mount it as a drive with WebDAV#
WebDAV is on by default on the same port. Log in with any username and your password; you can also type the password in the username field. The control panel's connect button lists the exact commands for your system.
Linux#
GNOME Files (Nautilus) and other GVFS file managers speak WebDAV; the connect button shows the commands. For a faster mount the docs recommend rclone (docs/rclone.md in the repository).
Windows (PowerShell)#
Map a network drive: This PC, Map network drive, folder http://<server-ip>:3923/, and use alice's password as the username. Or from PowerShell:
net use Z: http://<server-ip>:3923/ /user:alice <ALICE_PASSWORD>
The GUI route is from the docs; net use is standard Windows.
Mac (Terminal)#
In Finder choose Go, Connect to Server, then enter http://<server-ip>:3923/ and your password.
Check it worked. The drive or Finder window lists hello.txt.
Tip: Editing existing files over WebDAV needs delete permission, and some clients need the
dawoption, which makes PUT uploads overwrite files for accounts with delete access.
Put it behind HTTPS (with or without Traefik)#
Clients send passwords, so over the internet they need HTTPS. The docs say to ignore copyparty's own HTTPS and use a reverse proxy. This section is for a server with a domain; local-only users can skip it.
Both routes need two changes. First, copyparty must trust the proxy's forwarded client address. Add to [global] in copyparty.conf:
xff-src: lan # trust X-Forwarded-For from private (Docker) addresses
With Caddy, which sends exactly one client IP, also add rproxy: 1. The README's rule: 1 if the header holds only the correct IP, a negative value if it holds several. With Traefik, start with xff-src alone and follow the hint copyparty prints in its log. Second, the container joins the shared proxy network and no longer publishes a port.
With Traefik#
On a server that already runs Traefik v3 with the Docker provider, add labels and drop the host port. The docs say to use Traefik v3.6.7 or newer because of CVE-2025-66490; v3.7.19 was the latest on 2026-11-16.
docker network create proxy
Replace docker-compose.yml (the entrypoint name https is an example; use yours):
services:
  copyparty:
    image: copyparty/ac:1.20.26
    container_name: copyparty
    restart: unless-stopped
    user: "1000:1000"
    volumes:
      - ./config:/cfg
      - ./data:/w
    environment:
      PYTHONUNBUFFERED: 1
    stop_grace_period: 15s
    networks:
      - proxy
    labels:
      - "traefik.enable=true"
      - "traefik.docker.network=proxy"
      - "traefik.http.routers.copyparty.rule=Host(`files.<your-domain>`)"
      - "traefik.http.routers.copyparty.entrypoints=https"
      - "traefik.http.routers.copyparty.tls=true"
      - "traefik.http.services.copyparty.loadbalancer.server.port=3923"

networks:
  proxy:
    external: true
The project's Traefik example sets readTimeout: "0s" on the entrypoint ("don't disconnect during big uploads"); that belongs in Traefik's static config, not in labels.
Check it worked. curl -I https://files.<your-domain>/ returns an HTTP status line over HTTPS and the login page opens with a valid certificate.
Without Traefik: Caddy#
Choose this if you have no Traefik. Caddy gets and renews its certificates by itself. Our Caddy guide covers it in depth. The pieces for copyparty:
mkdir -p ~/docker_volumes/caddy/{conf,data,config}
cd ~/docker_volumes/caddy
~/docker_volumes/caddy/docker-compose.yml (image caddy:2.11.9, the latest on Docker Hub on 2026-11-16):
services:
  caddy:
    image: caddy:2.11.9
    container_name: caddy
    restart: unless-stopped
    ports:
      - "80:80/tcp"
      - "443:443/tcp"
      - "443:443/udp"
    volumes:
      - ./conf:/etc/caddy:ro
      - ./data:/data
      - ./config:/config
    networks:
      - proxy

networks:
  proxy:
    external: true
~/docker_volumes/caddy/conf/Caddyfile for a public domain (Let's Encrypt needs ports 80 and 443 reachable and a DNS record pointing at your server):
files.example.com {
    reverse_proxy copyparty:3923
}
For a home-only name, tls internal makes Caddy sign its own local certificate:
files.home.arpa {
    tls internal
    reverse_proxy copyparty:3923
}
Then put copyparty on the same network: in its docker-compose.yml delete the ports: block and add networks: [proxy] plus the networks: proxy: external: true block shown above. Start both:
docker network create proxy
cd ~/docker_volumes/caddy && docker compose up -d
cd ~/docker_volumes/copyparty && docker compose up -d
Devices that should trust tls internal need Caddy's root certificate; in a container you copy it out yourself: docker exec caddy find /data -name root.crt, then docker cp caddy:<path-from-find> ./caddy-root.crt. Install it under Trusted Root Certification Authorities on Windows, in Keychain Access (Always Trust) on Mac, or in your distribution's CA store on Linux. Those OS steps are not from the copyparty docs.
Windows and Mac: run these on the Linux server. The same files work in Docker Desktop for a home-only name, but we did not test that.
Check it worked. curl -I https://files.example.com/ shows an HTTP status line over HTTPS (Windows: curl.exe -I).
Tip: Run copyparty on its own domain or subdomain. The docs say serving it under a path with
--rp-loccosts speed and has "a higher chance of bugs".
Other ways in: FTP, SFTP and friends#
Off by default. Each needs its own port and is set in [global].
| Protocol | Setting | Port in the docs | Notes |
|---|---|---|---|
| WebDAV | on by default | 3923 | Same port as the web page |
| FTP | ftp: 3921 | 3921 | Also set ftp-pr: 12000-12099 and publish that range; behind NAT add ftp-nat: <external-ip> |
| SFTP | sftp: 3922 | 3922 | Needs the ac, im, iv or dj image; keys via sftp-key, passwords only with sftp-pw |
| TFTP, SMB | tftp, smb | 3969, 3945 | Skip unless needed |
FTP uploads are not resumable. Publish only the ports you use. An FTP flaw (uploads outside the defined volumes) was fixed in v1.20.19 on 27 July 2026, so run FTP only on a current version.
Without Docker (native)#
The project's first choice needs only Python.
Linux#
curl -L -o copyparty-sfx.py https://github.com/9001/copyparty/releases/latest/download/copyparty-sfx.py
python3 copyparty-sfx.py -c ~/docker_volumes/copyparty/config/copyparty.conf
In that config the volume path is a real folder instead of /w. For a service, see contrib/systemd/copyparty.service in the repository.
Windows (PowerShell)#
Use the sfx with Python from python.org (not winget or the Microsoft Store, say the docs), or copyparty.exe from the releases page. Config paths look like c:\pub.
Mac (Terminal)#
brew install copyparty ffmpeg
copyparty -c ~/copyparty.conf
The Homebrew formula was at 1.20.26 on 2026-11-16.
Security and testing#
copyparty has no setup wizard and no default admin: what you write in copyparty.conf is the whole access policy.
| Control | How |
|---|---|
| Accounts before exposure | Never run the quick-start command unchanged on a network you do not trust |
| Config file | Readable only by you; the owner must match the container's user: |
| Password hashing | Add ah-alg: argon2 to [global] and restart; the docs say plaintext passwords are printed as hashes to paste in |
| Anonymous uploads | Use the nohtml volume flag to block HTML and script in uploads |
| Ports | Publish only 3923, or nothing behind a proxy. Open FTP and SFTP ports only if used |
| Version checker | Optional vc-url: https://api.copyparty.eu/advisories banners known vulnerabilities; it contacts that feed every 3 hours |
| Docker socket | Not needed; never mount it |
| Single sign-on | Not native; header-based identity providers (Authelia, authentik) work |
The 1.20.26 notes list advisory GHSA-hg99-jqfp-rf76 as "not a cause for concern in any realistic scenario". Announcements go to the project's Discord and the GitHub security page.
Quick tests:
cd ~/docker_volumes/copyparty
docker compose ps
docker compose logs --tail=100 copyparty
curl -I https://files.<your-domain>/
On Windows run the same in PowerShell with curl.exe. Also check that a private window sees no files and that bob cannot delete.
How it compares#
copyparty's own comparison admits "some unintentional bias" and tested older versions of the others.
| copyparty | Nextcloud | File Browser | |
|---|---|---|---|
| Your files | Stay normal files in your folder | Per-user storage plus a database | Stay normal files |
| Resumable uploads | Yes, built in | Segmented, not resumable | Resumable, segmented |
| Protocols | Web, WebDAV, FTP, SFTP, SMB, TFTP | Web and WebDAV | Web only |
| Apps, calendar, office | No | Yes, a large ecosystem | No |
| Phone apps | Android upload app, iPhone shortcut | Full apps | No |
| Per-file permissions, full-text search | No | Yes | No |
| Settings in a web GUI | No (config file) | Yes | Yes |
| Licence | MIT | AGPL | Apache-2.0 |
Dufs is another simple option, without resumable uploads. Choose copyparty for fast, resumable transfers of big files from folders you already have. Choose Nextcloud for a collaboration suite, as in our Nextcloud guide. For two-way sync between devices, copyparty says it will never offer full sync; use Syncthing, which the README says combines safely with copyparty.
Common mistakes#
| Mistake | Why it happens | Do this instead |
|---|---|---|
| Starting the official quick-start command unchanged | The container shares /w read-write for anyone by default | Write the config from Step 2 first and test with a private window |
| Config file ignored, server stays open | Files must be named something.conf and sit in the folder mounted at /cfg | Name it copyparty.conf, mount the folder, and check the log |
| Folder ownership does not match the container user | The container runs as 1000:1000; issue #1640 (closed September 2026) failed to move folders because the new ones had another owner | Set user: to the owner of your files (id -u, id -g) |
Using copyparty/ac with no tag | The official quick start and Compose example use latest | Pin copyparty/ac:1.20.26 and read the release notes before changing it |
| Copying example paths from the README | The big example configs use native paths such as /home/ed/Music | In Docker, share paths below /w |
Getting thank you for playing behind a proxy | copyparty sees the proxy's IP, not the client's, and bans it as a bad client (README FAQ) | Set xff-src and, for Caddy, rproxy: 1; follow the log advice |
Copying Cloudflare settings such as xff-hdr: cf-connecting-ip | That header exists only behind Cloudflare; issue #1347 was solved by removing it | Use the default x-forwarded-for with Caddy or Traefik |
| Publishing only FTP port 3921 | FTP also opens passive data ports | Set ftp-pr and publish that range too |
| Putting the index on a network or VM share | SQLite misbehaves there; the README lists vboxsf, mergerfs and network disks | Keep hist on local disk, as in Step 2 |
AI assistants: inventing PUID, PGID, admin-password environment variables or oidc- settings | Assistants copy patterns from other images. This image uses user: and a .conf file; OIDC is only a feature request (issue #1699) | Use only options that appear in the README or in --help |
| AI assistants: suggesting a Cloudflare quick tunnel or a sub-path | The README mentions both | Use Caddy or Traefik on a subdomain |
Tip: Before pasting any option, search the README for its exact name, or run
docker run --rm copyparty/ac:1.20.26 --help. If it is in neither, it does not exist.
Tip: After a config change, use the control panel's
reload cfgbutton for accounts and volumes; changes to[global]need a restart.
Tip: Give every account a different password, and keep passwords out of URLs.
?pw=works but ends up in browser history and logs.
Troubleshooting#
| Problem | Solution |
|---|---|
| Container restarts or is unhealthy | docker compose logs --tail=100 copyparty; look for config errors |
| Everyone can upload | Config not loaded; check the file name and the /cfg mount |
| Login works but you land on the login page again | Reported behind Traefik (issue #1402, closed April 2026): test directly on port 3923 first, then recheck xff-src and rproxy against the log hint |
| Thumbnails missing for HEIC photos or H.265 video | The Docker images cannot read them for legal reasons (README FAQ) |
| Thumbnails blank behind a proxy | The proxy strips query strings such as ?th=w |
| Windows WebDAV cannot write to a folder that allows anonymous reading | Windows skips login there; connect first to a password folder, or set dav-auth |
Edited file becomes notes.txt-<digits>.txt | The client needs the daw option; read its warning first |
SQLite Disk I/O Error | The index is on a VM or network share; set hist to a local path |
thank you for playing#
A plain 403 page. The IP copyparty sees was banned for malicious-looking traffic; the default is 24 hours after 9 failed logins in an hour. Behind a proxy, fix real-IP detection with xff-src and rproxy.
cors-reject POST because request-header Origin=...#
Reported in issue #1347 behind Traefik: the Origin header did not match the protocol and host copyparty saw. The message suggests --ihead='*' to show request headers. The maintainer's answer: remove xff-hdr: cf-connecting-ip and rproxy: 1, then follow the log message. The reporter confirmed it worked.
incorrect --rp-loc or webserver config; expected vpath starting with [...]#
The proxy strips its path from request URLs. Prefer a subdomain.
Looks like javascript is broken; see "csp nonce" in the readme#
Something in your hosting stack tampers with responses; the README names Cloudflare Rocket Loader.
failed to register layer: lsetxattr user.overlay.impure /etc: operation not supported#
Rootless Docker on Debian 12. The project's FAQ says to use Podman or configure Docker's fuse-overlayfs storage driver.
PermissionError [Errno 13] Permission denied: b'/.hist'#
copyparty cannot create its index folder (issue #273, open). Set hist: /cfg/hists, as in Step 2.
Known bugs#
- Issue #1706 (open, November 2026): a Docker 1.20.26 container exited with status 135 several times, with
Fatal Python error: Bus errorin SQLite indexing. The cause is unknown; the reporter's media was on SSHFS. No confirmed fix. - Issue #1698: the Logout link does not clear the password cookie when identity-provider headers are used.
We found no widespread breakage reports for 1.20.26, so we pin it. Diagnostics: docker compose ps, docker compose logs --tail=200 copyparty, docker inspect copyparty.
Updates and backups#
Update. Read the release notes, change the tag in docker-compose.yml, then:
cd ~/docker_volumes/copyparty
docker compose pull
docker compose up -d
docker compose logs --tail=40 copyparty
On Windows run the same in PowerShell. The README says restarting or upgrading during an upload is safe, because upload clients resume. Update promptly after a security announcement; v1.20.17 introduced CSP nonces that can break some JavaScript plugins.
Back up. Your files need your normal backup. Also back up the config and index. The index can be rebuilt by rescanning, but that takes time on big folders (our reasoning):
cd ~/docker_volumes/copyparty
docker compose stop
tar -czf "backups/copyparty-config-$(date +%F).tar.gz" config
chmod 600 backups/copyparty-config-*.tar.gz
docker compose start
For 03:00 nightly on Linux or Mac, save those lines as backup.sh, make it executable, and add 0 3 * * * ~/docker_volumes/copyparty/backup.sh via crontab -e. The archive holds account passwords; keep it private.
Windows (PowerShell)#
Set-Location "$HOME\docker_volumes\copyparty"
docker compose stop
Compress-Archive -Path config -DestinationPath "backups\copyparty-config-$(Get-Date -Format yyyy-MM-dd).zip" -Force
docker compose start
Save those lines as backup.ps1 and schedule it for 03:00 in Task Scheduler.
Restore test. Unpack into a new empty folder, never over the live one, and look inside:
mkdir -p /tmp/restore-test && tar -xzf backups/copyparty-config-<date>.tar.gz -C /tmp/restore-test
ls /tmp/restore-test/config
Performance and resources#
The project publishes no RAM or CPU minimums. Image sizes are documented:
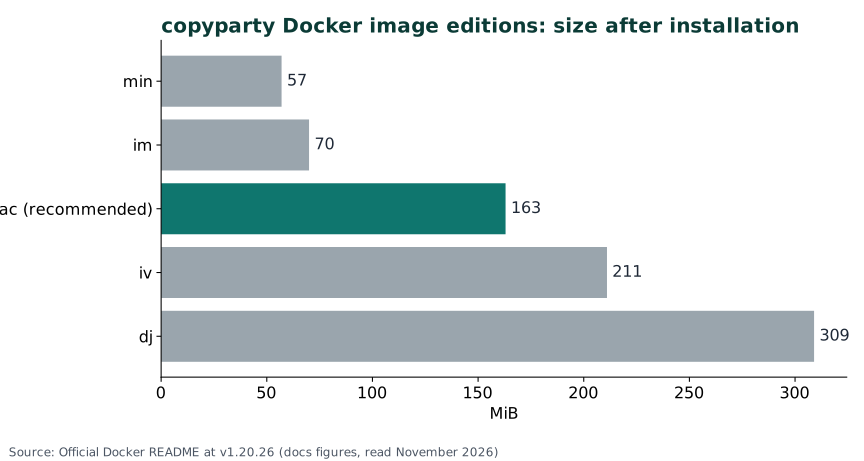
The only memory figure we found is a user report (#1706) of a container reaching its 1 GiB limit while indexing a large library; it is not a typical value. Measure yours with docker stats copyparty.
The README says defaults are usually fine (about 8 GiB/s download, 1 GiB/s upload on the author's hardware). Tuning from the docs:
- Put
histon an SSD; it speeds up listings, searches and thumbnails. - mimalloc (
LD_PRELOAD=/usr/lib/libmimalloc-secure.so.2) makes zip downloads about 3x and indexing about 1.5x faster but doubles RAM, and is marked "maybe buggy". We leave it off. - HTTP/2 and HTTP/3 can make uploads slower than HTTP/1.1.
FAQ#
Is it safe to put on the internet? Only with accounts configured, HTTPS in front, and updates applied. The default is open.
Can I use my existing folders? Yes. Mount them below /w.
Why Docker for a one-file program? The image bundles FFmpeg and Pillow for thumbnails and audio. Native installs work too.
Does it need a database or a lot of RAM? No separate database; each volume keeps a SQLite index. RAM is not documented; watch docker stats.
Can I sign in with Google or another SSO provider? Not natively. An identity provider that sets a trusted header works. Issue #1699 asks for OIDC.
Can I upload from my phone? Yes: the browser works, plus an Android upload app (PartyUP) and an iPhone shortcut.
Sources#
- copyparty at v1.20.26: README, release, Docker README, Compose example, LICENSE, real-IP notes, Traefik example, logo, option help - read November 2026
- Docker Hub copyparty/ac, Homebrew formula, Caddy v2.11.9, Caddy reverse_proxy, Traefik v3.7.19 - read November 2026
- GitHub issues #273, #1347, #1402, #1640, #1692, #1698, #1699, #1706 - read November 2026

Checked against the official docs on 2026-11-16.