Vane with Docker: a private AI answer engine with SearXNG and Ollama (Linux, Windows, Mac)
Before you start
- 20 min read
- 24 to run in terminal
- 5 file contents
Boxes marked Run in terminal are what you type; plain text explains why. Check what you need first
What you get in one minute#
Vane is a self-hosted AI answer engine: you ask a question, it searches the web through a SearXNG instance, and a model you choose writes an answer with the sources under it.

Logo: the official Vane project icon (github.com/ItzCrazyKns/Vane, file public/icon.png)
The project used to be called Perplexica. It was renamed in March 2026, and the old GitHub address now redirects to the Vane repository. This guide uses the current name, repository and Docker image everywhere.
The model can run on your own computer through Ollama, the search runs through a SearXNG instance that the full image bundles, and your chats stay in a folder you own. You need no search API key. A cloud model with your own key is optional; the privacy section says exactly what it receives.
| Current version | v1.12.2, released April 2026 (latest GitHub release; this guide pins it) |
| Licence | MIT |
| Time needed | About 30 minutes, plus the image download and your model download |
| Size on disk | About 3.9 GB for the full image and 0.58 GB for the slim image (Docker Hub sizes, not measured by us) |
| Hardware | Not documented by the project. Your model decides the RAM you need |
| Ports | 3000 for the web app. The full image also runs SearXNG on port 8080 inside the container; this guide does not publish it |
| Official docs | github.com/ItzCrazyKns/Vane (README and docs/installation) |
At a glance:
- What it is: a web app (Next.js) with cited answers, search modes, file uploads and a history of your searches.
- Models: Ollama on your computer, or a cloud provider with your own key (the README names OpenAI, Anthropic Claude, Google Gemini and Groq; you enter the key in the setup screen).
- Search: the full image bundles SearXNG, so there is no search key to get.
- Difficulty: easy to medium. You copy one Compose file and one small
.envfile. Connecting Ollama from inside Docker is the usual snag. - You need: Docker with Compose v2, a free port 3000, and either Ollama with a model or a cloud API key.
- Watch out: Vane has no login in this release. The README lists authentication as an upcoming feature. Keep it on your own computer.
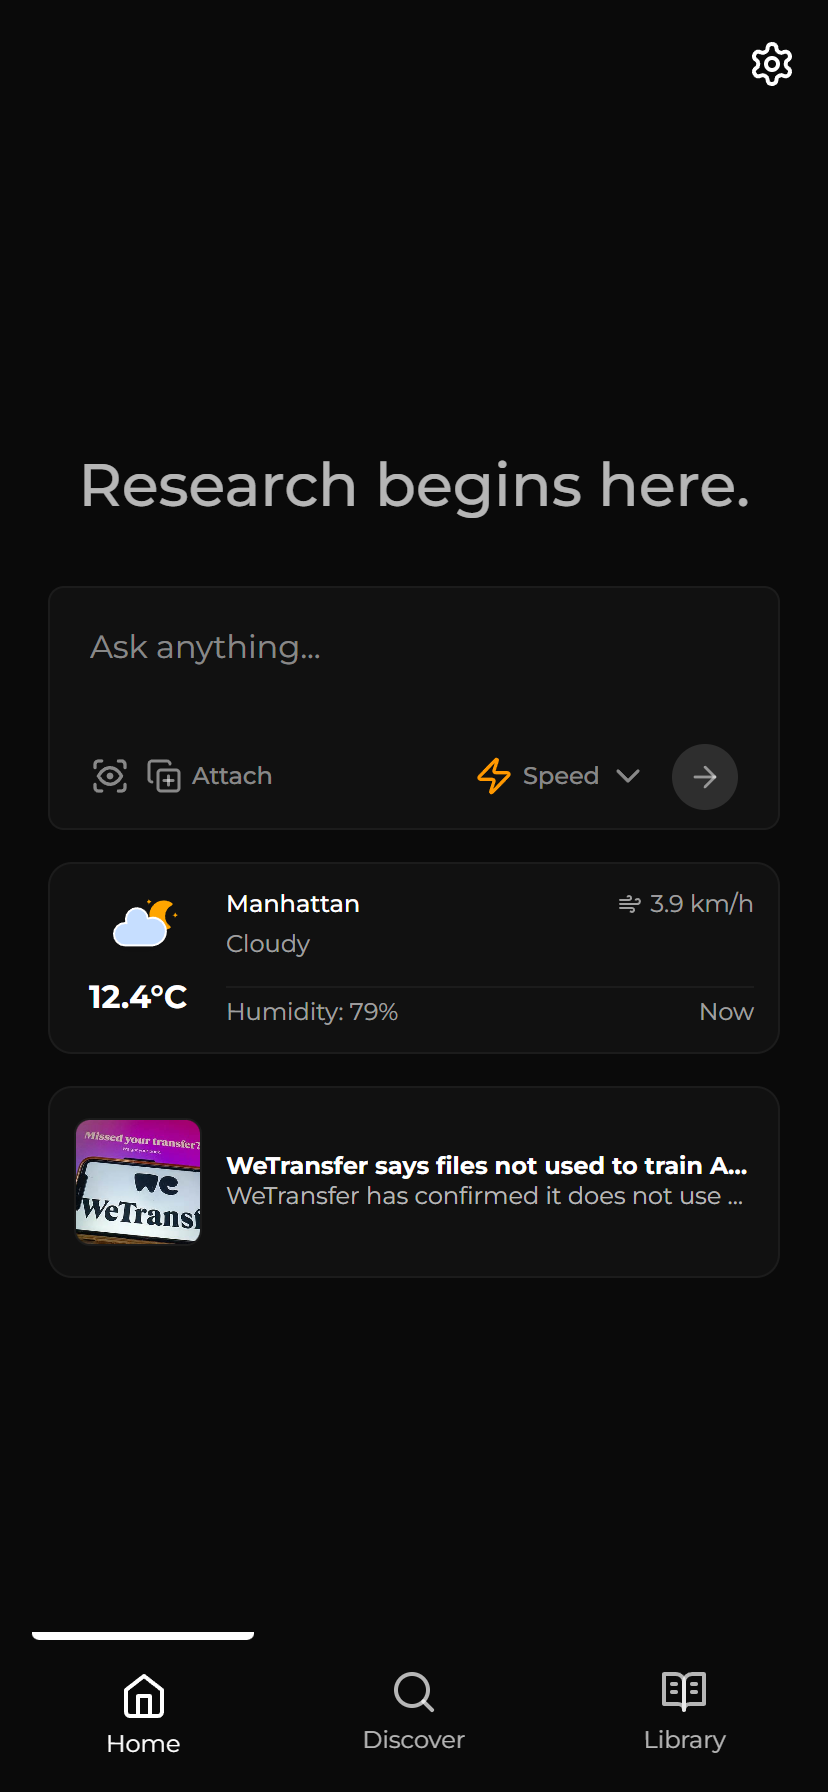
Image: the official Vane repository screenshot, public/screenshots/p1_small.png at v1.12.2 (file on GitHub), unchanged.

How it fits together#
Your question stays on your computer until the search step. Then only the search terms go out to the search engines. The answer comes from the model you chose.

The solid arrows are the default path. The dashed arrow is optional: it exists only if you add a cloud model with your own key. Drawn by DIY Lab Hub from the official README and Dockerfiles at v1.12.2, April 2026.
| Part | Where it runs | What it does |
|---|---|---|
Vane web app (service vane) | Docker container, port 3000 | Chat screen, search pipeline, settings, history |
| SearXNG | Inside the same container (full image only) | Asks the search engines and returns results |
| Ollama | Your computer, outside Docker | Runs the model that writes the answer |
| Data folder | ~/docker_volumes/vane/data | The database (db.sqlite) and uploaded files |
If you already run your own SearXNG, the slim image can use it instead. See the FAQ, and our SearXNG guide for setting one up.
Before you start#
The project documents no hardware minimum, so the table lists what the setup needs.
| Linux | Windows | Mac | |
|---|---|---|---|
| Docker | Docker Engine with Compose v2 | Docker Desktop with the WSL2 backend | Docker Desktop |
| Shell | bash | PowerShell | Terminal |
| Disk | About 4 GB for the image, plus your model | Same, plus the WSL2 disk | Same, plus the Docker disk |
| RAM | Not documented by Vane; your model decides | Same | Same |
| Ollama | Installed on the host | Installed on Windows | Installed on the Mac |
We did not run these commands on any system. The platform notes come from the documentation.
Check your tools:
docker --version
docker compose version
docker --version
docker compose version
Checklist:
- [ ] Docker runs (
docker psworks without an error) - [ ] Port 3000 is free (if Step 3 reports it is taken, change the port there)
- [ ] Ollama is installed and running with one model pulled, or you have a cloud API key
- [ ] About 4 GB of free disk space for the image
- [ ] You know that anyone who can reach port 3000 can use your settings and keys, so this stays on your own computer
Tested by DIY Lab Hub: not run. Every command here comes from the Vane README, its Dockerfiles, its compose file and the Docker Hub tag list, read on 2026-10-30.
Step 1: Create the folders and the .env file#
Vane keeps its data in a folder under ~/docker_volumes. The .env file holds only the path to that folder; this setup needs no secret.
Linux#
mkdir -p "$HOME/docker_volumes/vane/data" "$HOME/docker_volumes/vane/backups"
cd "$HOME/docker_volumes/vane"
printf 'DATA_ROOT=%s/docker_volumes\n' "$HOME" > .env
Windows (PowerShell)#
$Root = Join-Path $HOME "docker_volumes"
New-Item -ItemType Directory -Force -Path (Join-Path $Root "vane\data"), (Join-Path $Root "vane\backups") | Out-Null
Set-Location (Join-Path $Root "vane")
@("DATA_ROOT=$($Root.Replace('\','/'))") | Set-Content -Encoding ascii .env
Mac (Terminal)#
Same commands as Linux.
Check it worked. On Linux or Mac, cat .env shows one line that starts with DATA_ROOT=. On Windows, Get-Content .env shows the same line. The folders data and backups exist under vane.
Tip: Create the data folder before the first start. If Docker creates it for you, it may be owned by root, and the backup steps later in this guide will then need
sudo.
Step 2: Save the Compose file#
Save this as docker-compose.yml in the vane folder. It pins the release tag, publishes the port only on your own computer, and keeps the data in your folder. It has no version: line, because Compose v2 no longer needs one.
name: vane

services:
  vane:
    image: itzcrazykns1337/vane:v1.12.2
    restart: unless-stopped
    ports:
      - "127.0.0.1:3000:3000"
    volumes:
      - "${DATA_ROOT}/vane/data:/home/vane/data"
Linux#
nano docker-compose.yml
Paste the file, then save with Ctrl+O and exit with Ctrl+X.
Windows (PowerShell)#
notepad docker-compose.yml
Paste the file and save. Notepad may add .txt to the name. In the Save dialog, choose "All files" so the name stays docker-compose.yml.
Mac (Terminal)#
open -e docker-compose.yml
Paste the file, save, and make sure TextEdit is in plain text mode (Format, Make Plain Text).
Check it worked. Run ls -l docker-compose.yml .env on Linux or Mac. On Windows, run Get-ChildItem docker-compose.yml, .env. Both names must be exact.
Tip: The image tag is the one thing to change when you update. Keep
v1.12.2until you have read the release notes for a newer tag. Never switch tolatest(see Updates and backups).
Step 3: Start Vane#
Check the file, pull the image, and start the container. The first pull downloads about 3.9 GB, so it can take a long time on a slow connection.
Linux#
docker compose config --quiet
docker compose pull
docker compose up -d
docker compose ps
Windows (PowerShell)#
docker compose config --quiet
docker compose pull
docker compose up -d
docker compose ps
Mac (Terminal)#
Same commands as Linux.
Check it worked. docker compose ps lists the service vane as running. Then ask the server for its start page. On Linux or Mac:
curl -s -o /dev/null -w "%{http_code}\n" http://localhost:3000
On Windows:
(Invoke-WebRequest -Uri http://localhost:3000 -UseBasicParsing).StatusCode
A 200 means the page answered. If Docker says the port is already allocated, change the left-hand port in the ports: line to 3001 (keep 127.0.0.1: in front), run docker compose up -d again, and open port 3001 instead. Every address below then uses 3001.
Step 4: Connect a model in the setup screen#
Open http://localhost:3000 in your browser. The README says you configure everything (API keys, models and so on) in the setup screen, not in a file. For Ollama, type the address that reaches Ollama from inside the container. This address is the part most people get wrong.
| Your system | Ollama address to type in the setup screen |
|---|---|
| Linux | http://<private_ip_of_host>:11434 (the LAN address of your computer) |
| Windows | http://host.docker.internal:11434 |
| Mac | http://host.docker.internal:11434 |
Inside the container, localhost is the container itself, so http://localhost:11434 will fail. The address for Windows and Mac is what the README gives for Docker Desktop.
Linux#
On the host, find your LAN address:
hostname -I | awk '{print $1}'
The README's Linux note: Ollama must listen beyond 127.0.0.1. Open an override for the Ollama service, paste the two lines below, save and exit the editor:
sudo systemctl edit ollama
[Service]
Environment="OLLAMA_HOST=0.0.0.0:11434"
Then reload systemd and restart Ollama:
sudo systemctl daemon-reload
sudo systemctl restart ollama
0.0.0.0 means Ollama answers on every network interface. Block port 11434 at your firewall for other networks.
Windows (PowerShell)#
Use http://host.docker.internal:11434 in the setup screen. Confirm your model is there with:
ollama list
Mac (Terminal)#
Use http://host.docker.internal:11434 in the setup screen. Confirm your model is there with:
ollama list
We did not test whether Ollama on Windows or Mac accepts connections from the container with its default bind address. The README gives the address without a bind setting, so if the connection fails, read Troubleshooting before you change anything.
Check it worked. The model you pulled appears in the model list of the setup screen. If you see "Failed to connect to the server", go to Troubleshooting.
For Ollama basics (install, pull, ollama list), see our Ollama guide.
Step 5: Ask a question and check the sources#
Vane searches the web for questions that need current facts. The search runs through the SearXNG in the container, so there is nothing to configure for the full image.
- Open
http://localhost:3000. - Pick a search mode in the input box. The README describes Speed Mode for quick answers, Balanced Mode for everyday searches and Quality Mode for deep research. Start with Balanced.
- Ask something current, for example "What changed in the latest stable Linux kernel?"
- Open the sources under the answer. Click one and check it.
Linux#
Open http://localhost:3000 in your browser. The steps are the same.
Windows (PowerShell)#
Same steps. The browser is the only tool you need here.
Mac (Terminal)#
Same steps as Linux.
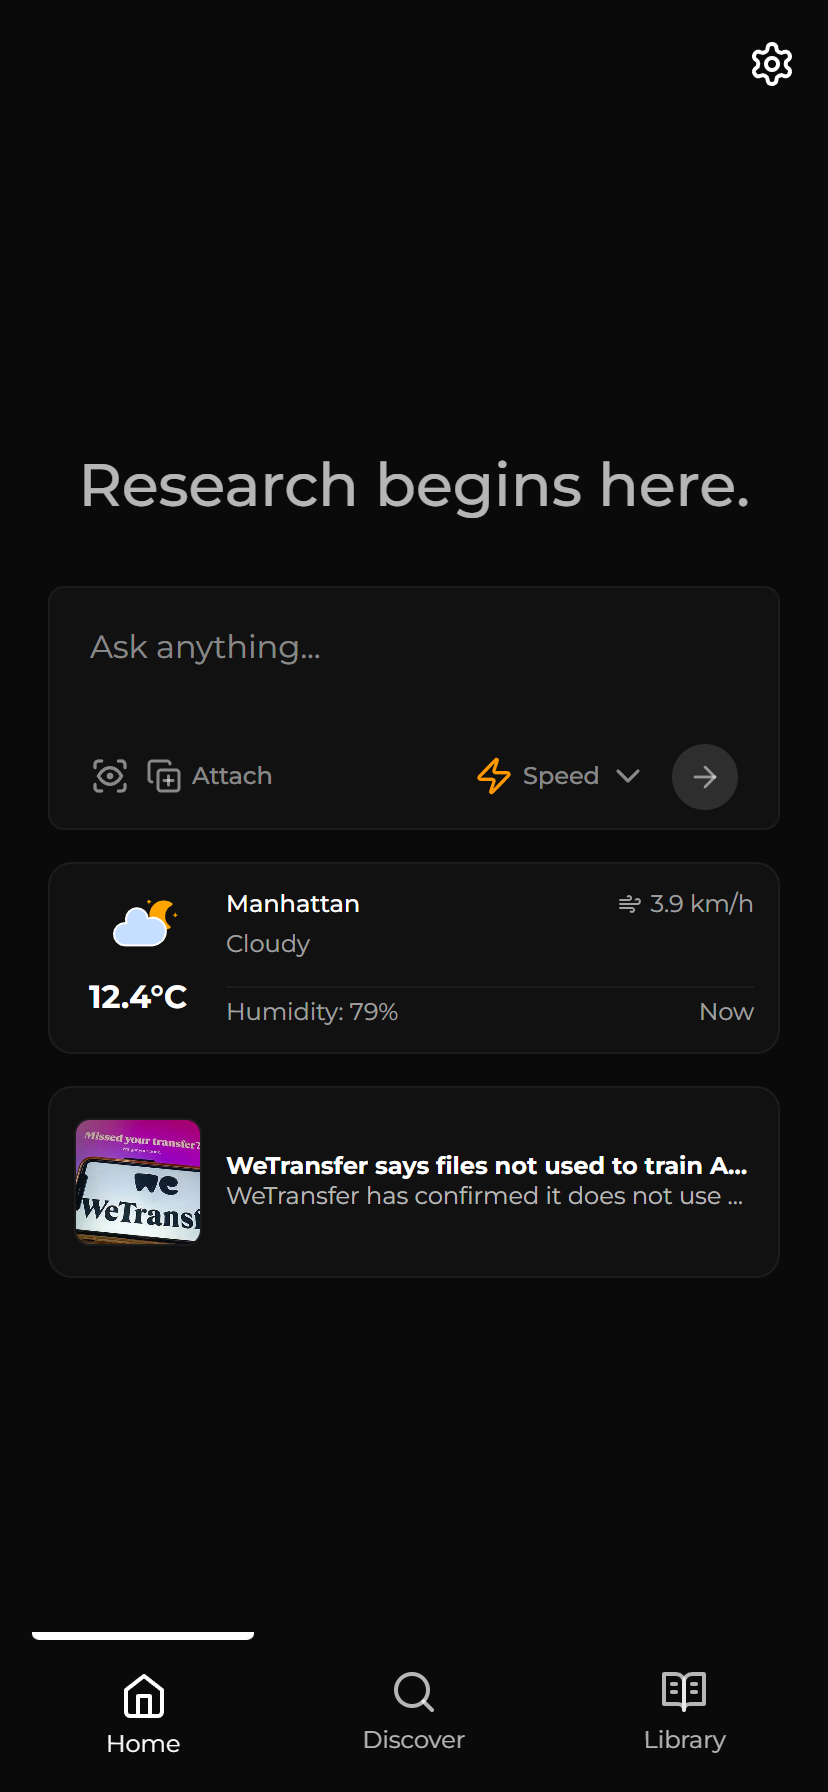
Check it worked. The answer shows source links, and the links open real pages. Button and label names may differ between releases; the README and the screenshot above are the reference (check them on your own screen).
Tip: If the answer says it could not find anything, ask again with a more specific question before you blame the install. Issue #1211 reports that general-knowledge questions can get "could not find any relevant information" from the classifier step.
Put it behind HTTPS (with or without Traefik)#
Two routes, both end with HTTPS. If you only use Vane on your own computer, skip this section.
Read this first: Vane has no login of its own in this release. HTTPS protects the traffic, not the app. Before you publish a domain, limit who can reach it: an IP allow list in Traefik, or a VPN such as WireGuard or Tailscale. Never publish the bare port 3000.
With Traefik#
This is for a server with a domain, DNS pointing to it, and ports 80 and 443 open on Traefik. Create the shared network once if it is missing:
docker network create proxy
On Windows PowerShell, use the same command. Then change the service in docker-compose.yml: remove the ports: lines, add the network and the labels below, and add the networks: block at the bottom.
services:
  vane:
    image: itzcrazykns1337/vane:v1.12.2
    restart: unless-stopped
    networks: [default, proxy]
    volumes:
      - "${DATA_ROOT}/vane/data:/home/vane/data"
    labels:
      - traefik.enable=true
      - traefik.docker.network=proxy
      - traefik.http.routers.vane.rule=Host(`vane.<your-domain>`)
      - traefik.http.routers.vane.entrypoints=https
      - traefik.http.routers.vane.tls=true
      - traefik.http.services.vane.loadbalancer.server.port=3000
      - traefik.http.routers.vane.middlewares=lan-only
      - traefik.http.middlewares.lan-only.ipallowlist.sourcerange=<your-lan-range>

networks:
  proxy:
    external: true
Name your entrypoint and certificate resolver as your own Traefik uses them. The label syntax follows Traefik's Docker provider; we could not read Traefik's docs page in this check, so confirm the label names against the Traefik version you run. Issue #1102 reports trouble when a container sits on several Docker networks; if the route fails, check the networks first.
Without Traefik: Caddy#
Caddy gets and renews certificates by itself. Use the public-domain version for a server with a domain, and the local certificate version at home.
Caddyfile for a public domain (Let's Encrypt, ports 80 and 443 open, DNS pointing to the server):
vane.example.com {
    reverse_proxy localhost:3000
}
Caddyfile for home only, with no public domain (Caddy's own local certificate, named by you in your router, Pi-hole or hosts file):
vane.home.arpa {
    tls internal
    reverse_proxy localhost:3000
}
Other devices trust the local certificate only after you install Caddy's root certificate on them.
Linux#
Install Caddy from the official Debian and Ubuntu packages (sudo apt install caddy, after the repository setup on caddyserver.com/docs/install). Save the Caddyfile at /etc/caddy/Caddyfile, then:
sudo systemctl reload caddy
Windows (PowerShell)#
Download the Windows build from caddyserver.com/download (we did not confirm a package-manager command in this check). In the folder with your Caddyfile:
caddy run --config Caddyfile
Mac (Terminal)#
brew install caddy
caddy run --config Caddyfile
Check it worked: curl -I https://vane.example.com (use your own name) should answer with a status line such as HTTP/2 200. For a home-only name, trust Caddy's root certificate on each device (see the tls internal page on caddyserver.com) before you open it in a browser.
Security and testing#
- Keep port 3000 on your computer. The Compose file binds it to
127.0.0.1, so only this computer can reach it. The README's "Expose Vane to network" section describes a setup we do not recommend without a login. - No login yet. Anyone who can reach the app can read your history and change settings. The README lists authentication as upcoming.
- API keys: open issue #1180 reports that API keys reach the browser. Treat any cloud key you enter as exposed to people who can open the app.
- Known server-side request issues: #1124 (SSRF through a model provider's base URL) and #1139 (a config API that controls the SearXNG URL) are open. Another reason not to publish the port.
- Passwordless sudo inside the full image: the Dockerfile gives the internal SearXNG user
NOPASSWD: ALL. It is inside the container, but you should know it is there. - Secrets: the
.envfile here holds only a folder path. Keep it out of git anyway.
Tests to run:
docker compose ps
docker compose logs --tail=50 vane
curl -s -o /dev/null -w "%{http_code}\n" http://localhost:3000
On Windows PowerShell, the same three lines work, except the last: use (Invoke-WebRequest -Uri http://localhost:3000 -UseBasicParsing).StatusCode.
Privacy: what leaves your machine#
The README says searches are "completely private". That is marketing wording. Here is what is true, based on how the stack is built:
| Step | What is sent | Who receives it |
|---|---|---|
| Web search | The query text, and the server's IP address | The search engines that the bundled SearXNG queries |
| Reading a result | A page request from your computer | The website you read |
| Local model (Ollama) | Nothing outside your computer | Stays on your computer |
| Cloud model (only if you add a key) | Your prompt and the sources as context | The provider you chose |
| Your chats and uploads | Nothing | Stored in ~/docker_volumes/vane/data |
So the honest version: your prompts stay local when you use Ollama, but your search terms still reach outside search engines. We did not audit the code for telemetry, and the README does not describe any.
Tip: If a question must not reach any search engine, do not ask it in Vane's search mode. Use Ollama directly for that question (see our Ollama guide).
Common mistakes#
| Mistake | Why it happens | Do this instead |
|---|---|---|
Using :latest, then a chat breaks after an update | latest was rebuilt in September 2026 with no GitHub release. Issue #1154 reports that moving from 1.12.1 to 1.12.2 left chats "Brainstorming forever" | Pin itzcrazykns1337/vane:v1.12.2 and move the tag on purpose after reading the release |
| Pulling an image under an older name | Older guides still use the previous name. An old image name is still on Docker Hub, last updated February 2026 | Use itzcrazykns1337/vane and the repository ItzCrazyKns/Vane |
Typing http://localhost:11434 for Ollama | Inside the container, localhost is the container. Issue #572 ("Failed to connect to the server") and #1058 ("can't get ollama setup") come from this | Use the address for your system from Step 4 |
Ollama listening only on 127.0.0.1 on Linux | The container cannot reach an address that only the host answers | Set OLLAMA_HOST=0.0.0.0:11434 as in Step 4, then firewall port 11434 |
| Running the source-build update without a data volume | The project's own UPDATING file gives a source-build docker run with no -v. Remove that container and the data goes with it | Keep the volume (-v or the compose volumes: line) and back up before every update |
| Using your own SearXNG without JSON or Wolfram Alpha | The README requires both. Issue #1119 reports "Found 0 results" with an external SearXNG | Enable the JSON format and the Wolfram Alpha engine in that SearXNG, or use the full image |
| Publishing the port to the internet | There is no login yet, and open issues #1123 (missing authentication) and #1124 (SSRF) are about exactly this | Keep the port on 127.0.0.1; use a VPN or a restricted proxy route |
| Expecting a small download | Docker Hub lists about 3.9 GB for the full image. Issue #1132 calls it "inflated to 8 Gb" | Plan the disk space. If you run your own SearXNG, the slim image is about 0.58 GB |
| Believing "completely private" | Marketing wording. Search engines still get the query and the server's IP address, and cloud providers get prompts | Read the privacy table and use Ollama for anything that must stay local |
An AI assistant suggests a config.toml file | Assistants trained on older material mention config.toml. The current repository has none (only .gitignore names it); providers are set in the setup screen | Check the README and compose file at the release tag, and enter providers in the setup screen |
Tip: Write down the tag you run (
docker compose imagesor theimage:line). Every bug report needs it, and so does every rollback.
Tip: Connect Ollama first, with a small model, before you add anything else. If the model list in the setup screen is empty, the problem is the address, not the model.
Troubleshooting#
| Problem | Solution |
|---|---|
| "Failed to connect to the server. Please try again later." (issue #572 title) | The Ollama address is wrong or unreachable. Fix the address (Step 4). On Linux, check OLLAMA_HOST and the firewall. Test Ollama on the host with ollama list |
| Docker says the port is already allocated (wording varies by version) | Another program uses port 3000. Change the left-hand port to 3001 in the ports: line, then docker compose up -d |
| Search returns "Found 0 results" (issue #1119 title) | Check the logs: docker compose logs --tail=100 vane. With an external SearXNG, check JSON and Wolfram Alpha as in Common mistakes |
| Stuck on "Brainstorming" (issues #1069, #1154, #1174) | Open issues with no fix in the docs. Stop the chat, try a different model, and report the logs with the issue number |
| Chat models empty after a restart (issue #1186, Anthropic provider) | Open bug. Re-enter the provider key in the setup screen and keep your backup |
| Pulling a tag fails (issue #1007 title) | Check the tag on the Docker Hub tags page. v1.12.2 and slim-v1.12.2 are listed there |
Known bugs (open on October 2026)#
- #1154 (June 2026): the update from 1.12.1 to 1.12.2 left chats "Brainstoming forever". Workaround: stay on the version that works and read the issue thread.
- #1174 (July 2026): stuck on "Brainstorming" with LM Studio and a Qwen model (skipSearch set, empty content).
- #1211 (October 2026): general-knowledge questions can get "could not find any relevant information".
- #1119 (April 2026): "Found 0 results" with an external SearXNG.
- #1186 (August 2026): chat models reset to an empty list after a container restart (Anthropic provider).
- #1207 (October 2026): the slim image binds to the container's hostname, which can be unreachable on containers with several networks.
Diagnostic commands:
docker compose ps
docker compose logs --tail=100 vane
docker inspect "$(docker compose ps -q vane)" --format '{{.State.Status}}'
On Windows PowerShell, use docker inspect (docker compose ps -q vane) --format '{{.State.Status}}' for the last line.
Updates and backups#
Update#
- Read the release notes for the new tag on the releases page.
- Back up first (below).
- Edit the
image:line indocker-compose.ymlto the new tag, for exampleitzcrazykns1337/vane:v1.12.3(use the tag you read about). - Pull and recreate the container:
docker compose pull
docker compose up -d
Pulling alone changes nothing: the container keeps the old image until you run up -d. Do not switch to latest: the repository's latest tag moved in September 2026 without a release.
Backup script#
Vane's state is the data folder: the database and the uploads. Stop the container for a clean copy.
Linux#
cd ~/docker_volumes/vane
docker compose stop vane
tar czf "backups/vane-$(date +%F).tgz" data docker-compose.yml .env
docker compose start vane
Windows (PowerShell)#
Set-Location "$HOME\docker_volumes\vane"
docker compose stop vane
Compress-Archive -Path data, docker-compose.yml, .env -DestinationPath "backups\vane-$(Get-Date -Format yyyy-MM-dd).zip"
docker compose start vane
Mac (Terminal)#
Same commands as Linux.
Schedule the Linux or Mac script with cron at 03:00 (crontab -e, then 0 3 * * * /path/to/your/backup-script.sh). On Windows, use Task Scheduler and run the PowerShell lines as a script.
Restore test#
Do this once, now. It unpacks into a scratch folder and touches nothing live.
mkdir -p ~/vane-restore-test
tar xzf ~/docker_volumes/vane/backups/vane-$(date +%F).tgz -C ~/vane-restore-test
ls ~/vane-restore-test/data
You should see db.sqlite (the code path is data/db.sqlite) and, after you have uploaded a file, an uploads folder. On Windows, run Expand-Archive into a temp folder and check data\db.sqlite.
A real restore: docker compose down, put the data folder back, then docker compose up -d.
Performance and resources#
- Hardware is not documented. The project gives no RAM or CPU minimum. Measure yourself:
docker stats --no-streamshows the container's memory and CPU while you ask a question. - The model is the real cost. The search and the web app are light compared with the model Ollama runs. Choose a model that fits your RAM first.
- Image size. Docker Hub lists about 3.9 GB for the full image and 0.58 GB for the slim one. Both Dockerfiles install Chromium through Playwright; the full image also bundles SearXNG, which is why it is bigger.
- Result count. Issue #1059 asks for a configurable limit; the docs offer none.
docker stats --no-stream
FAQ#
Do I need an API key? No, for the bundled search. You need a key only if you choose a cloud model.
Can I use my own SearXNG? Yes. Use the slim image and set SEARXNG_API_URL to your instance. The README requires the JSON format and the Wolfram Alpha engine to be enabled there. Our SearXNG guide shows the JSON setting for an instance you run yourself. Check the Wolfram Alpha engine name in your own SearXNG.
Is it fully private? No. Search engines receive your query text and the server's IP address. A cloud model receives your prompts. Ollama keeps the prompts on your computer.
Sources#
- Vane repository (README, licence, Docker and Ollama instructions, read 2026-10-30)
- Vane docker-compose.yaml on master (read 2026-10-30)
- Vane Dockerfile (full) and Dockerfile.slim on master (read 2026-10-30)
- Vane UPDATING guide at v1.12.2 (read 2026-10-30)
- Vane release v1.12.2 (April 2026)
- Rename commit "feat(app): rename to 'vane'" (March 2026)
- Docker Hub tags for itzcrazykns1337/vane (read 2026-10-30)
- Vane issues cited in this guide (open on 2026-10-30)
- Caddy: reverse_proxy quick start (read 2026-10-30)
- Caddy: tls directive, including tls internal (read 2026-10-30)
- Caddy: install (read 2026-10-30)
- Docker Compose file reference (read 2026-10-30)
Logo and screenshot: public/icon.png and public/screenshots/p1_small.png from the v1.12.2 tag, unchanged; the repository is MIT.

Checked against the official docs on 2026-10-30.