Open Notebook with Docker: A Private NotebookLM Alternative (Linux, Windows, Mac)
Before you start
- 21 min read
- 19 to run in terminal
- 11 file contents
Boxes marked Run in terminal are what you type; plain text explains why. Check what you need first
What you get in one minute#
Open Notebook is a free, self-hosted research notebook in the style of Google's NotebookLM: you add PDFs, web pages, audio and notes, then chat with them, search them and turn them into podcasts, with the AI model of your choice.

Logo: the official Open Notebook project (github.com/lfnovo/open-notebook)
Your notebooks, notes and search index live in a database on your own machine. The AI is a separate choice: run models locally with Ollama and nothing you write leaves the computer, or plug in a cloud provider and pay per use. The project lists 18+ providers and 1 to 4 podcast speakers (NotebookLM has 2).
| What | Value (official docs, read October 2026) |
|---|---|
| Current version | Open Notebook v1.15.0, released 4 October 2026 (latest release on GitHub) |
| Image to pin | lfnovo/open_notebook:1.15.0 (the tag exists on Docker Hub, about 600 MB to download) |
| Time needed | About 20 minutes for the cloud route (our estimate); local models add download time |
| RAM and disk | Docs: minimum 4 GB RAM and 2 GB disk, recommended 8 GB+ and 10 GB+. Not measured by us |
| Ports | 8502 (web UI), 5055 (REST API) |
| Licence | MIT (LICENSE at the release tag) |
| Official docs | github.com/lfnovo/open-notebook and open-notebook.ai |
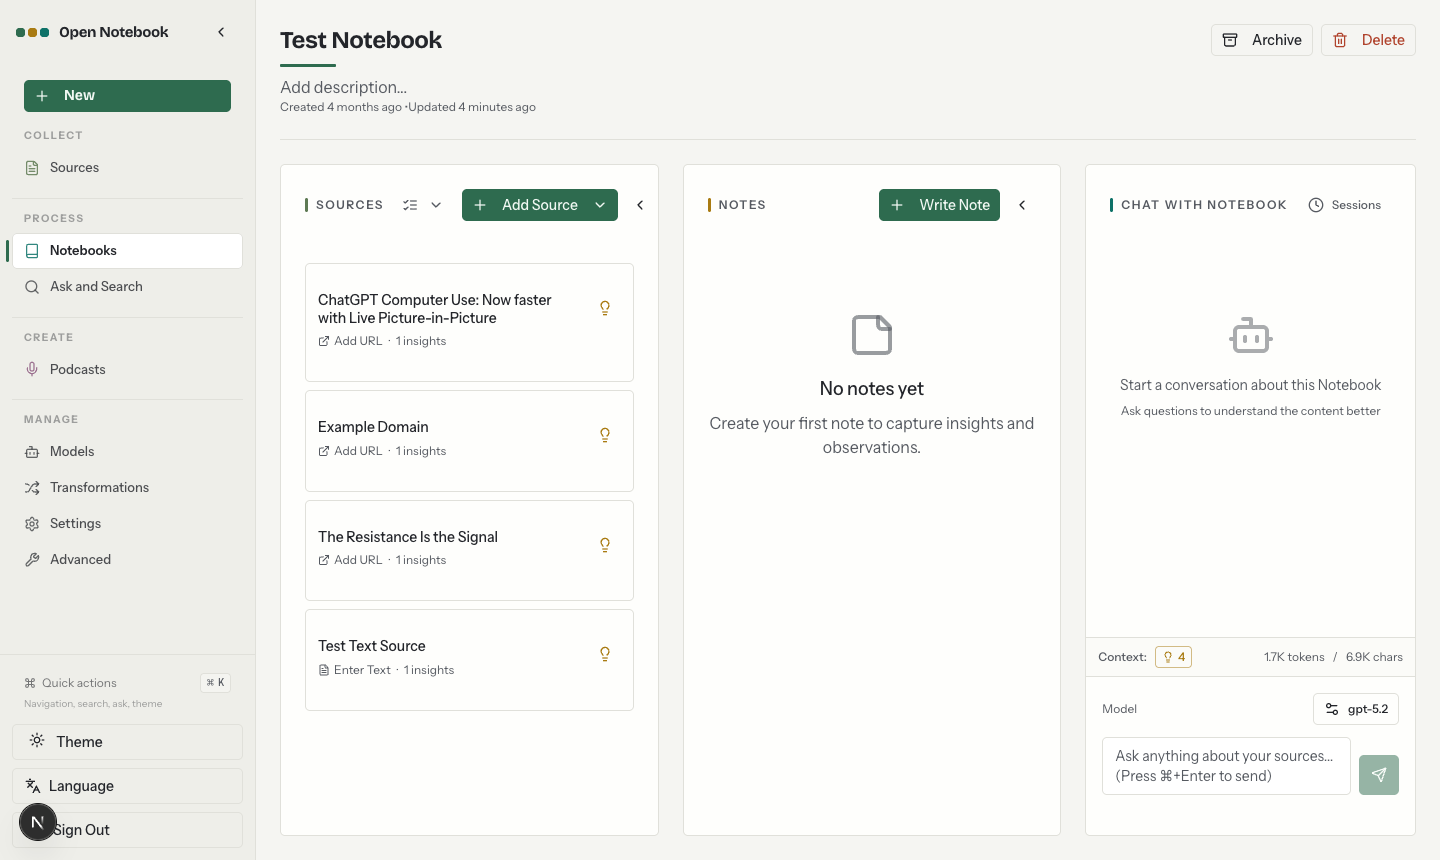
Image: the official Open Notebook project (README at v1.15.0)
At a glance:
- What it is: a web app, a REST API and a SurrealDB database, started with one Compose file.
- AI is your choice: Ollama and LM Studio run locally; OpenAI, Anthropic, Google and others run in the cloud. You add them in the web page, not in files.
- Podcasts need a voice: Ollama cannot speak. A local voice needs a text-to-speech server such as Speaches, or a cloud voice provider.
- Data: all in
~/docker_volumes/open-notebook/data. Back it up and keep the encryption key. - Safe by default here: pinned image, ports on
127.0.0.1, a login password, secrets in.env. - Fast-moving project: read Common mistakes first.
How it fits together#
You open one web page. The app saves everything in its database and calls the AI models you chose, one for chat, one for search, and optionally one for podcast voices.

Drawn for this guide from the official compose files and docs. Solid parts always run; dashed parts are optional. Cloud AI sends your text out; local AI does not.
Before you start#
Linux: Docker Engine with the Compose plugin, curl and openssl. Windows: Docker Desktop (Linux containers) and PowerShell. Mac: Docker Desktop and Terminal. If you need Docker on Ubuntu first, see our Docker on Ubuntu guide.
Check Docker on every system:
docker --version
docker compose version
Hardware (docs): Open Notebook needs 4 GB RAM minimum, 8 GB+ recommended. Ollama on CPU only needs 16 GB+ RAM to be usable; on a GPU, 8 GB VRAM runs most models.
Checklist:
- [ ] Docker and Docker Compose work (the two commands above)
- [ ] Ports 8502 and 5055 are free on your machine
- [ ] A cloud API key, or a computer able to run a local model
- [ ] A password manager open: you will save an encryption key and a password
- [ ] For the HTTPS section only: a domain with a DNS record, and ports 80 and 443 free
Tested on 2026-10-31: Linux = not run, Windows = the Compose file was parsed with docker compose config only, Mac = not run. The commands come from the official compose files and docs at v1.15.0 (see Sources).
Step 1: Create the folder and your secrets#
Open Notebook needs two secrets: an encryption key (it protects the AI provider keys you store) and a password (the shipped files run without one). We add a third, a database password. All three go in .env, never in the Compose file.
Linux#
mkdir -p ~/docker_volumes/open-notebook/{data/surreal,data/notebook,backups}
cd ~/docker_volumes/open-notebook
umask 077
cat > .env <<EOF
OPEN_NOTEBOOK_ENCRYPTION_KEY=$(openssl rand -hex 24)
OPEN_NOTEBOOK_PASSWORD=$(openssl rand -hex 24)
SURREAL_PASSWORD=$(openssl rand -hex 24)
EOF
chmod 600 .env
cat .env
Windows (PowerShell)#
New-Item -ItemType Directory -Force "$HOME\docker_volumes\open-notebook\data\surreal", "$HOME\docker_volumes\open-notebook\data\notebook", "$HOME\docker_volumes\open-notebook\backups" | Out-Null
Set-Location "$HOME\docker_volumes\open-notebook"
function New-Secret { $b = New-Object byte[] 24; [Security.Cryptography.RandomNumberGenerator]::Create().GetBytes($b); -join ($b | ForEach-Object { $_.ToString('x2') }) }
@("OPEN_NOTEBOOK_ENCRYPTION_KEY=$(New-Secret)", "OPEN_NOTEBOOK_PASSWORD=$(New-Secret)", "SURREAL_PASSWORD=$(New-Secret)") | Set-Content -Path .env -Encoding ascii
Get-Content .env
Mac (Terminal)#
Same commands as Linux.
Check it worked. You see three lines with long random values. Copy them into your password manager now: without the encryption key, stored provider keys become unreadable (official security page).
Tip: If you pick your own password, use only letters and digits:
$,#, quotes and spaces can be misread in.env.
Step 2: Write the Compose file#
This is the official compose file with changes: the image is pinned to 1.15.0; secrets come from .env; both ports are published on 127.0.0.1 only (the official file uses every interface); the database port is not published; data lives in ./data; and Ollama and Speaches are optional services that start only when you ask.
services:
  surrealdb:
    image: surrealdb/surrealdb:v2.7.0
    container_name: open-notebook-db
    command: ["start", "--log", "info", "--user", "${SURREAL_USER:-root}", "--pass", "${SURREAL_PASSWORD:?Set SURREAL_PASSWORD in .env}", "rocksdb:/mydata/mydatabase.db"]
    user: root
    environment:
      - SURREAL_EXPERIMENTAL_GRAPHQL=true
    volumes:
      - ./data/surreal:/mydata
    restart: unless-stopped

  open_notebook:
    image: lfnovo/open_notebook:1.15.0
    container_name: open-notebook
    ports:
      - "127.0.0.1:8502:8502"
      - "127.0.0.1:5055:5055"
    environment:
      - OPEN_NOTEBOOK_ENCRYPTION_KEY=${OPEN_NOTEBOOK_ENCRYPTION_KEY:?Set OPEN_NOTEBOOK_ENCRYPTION_KEY in .env}
      - OPEN_NOTEBOOK_PASSWORD=${OPEN_NOTEBOOK_PASSWORD:?Set OPEN_NOTEBOOK_PASSWORD in .env}
      - SURREAL_URL=ws://surrealdb:8000/rpc
      - SURREAL_USER=${SURREAL_USER:-root}
      - SURREAL_PASSWORD=${SURREAL_PASSWORD:?Set SURREAL_PASSWORD in .env}
      - SURREAL_NAMESPACE=open_notebook
      - SURREAL_DATABASE=open_notebook
    volumes:
      - ./data/notebook:/app/data
    depends_on:
      - surrealdb
    restart: unless-stopped

  ollama:
    image: ollama/ollama:0.40.13
    container_name: open-notebook-ollama
    profiles: ["ollama"]
    volumes:
      - ./data/ollama:/root/.ollama
    restart: unless-stopped

  speaches:
    image: ghcr.io/speaches-ai/speaches:0.8.3-cpu
    container_name: open-notebook-speaches
    profiles: ["speaches"]
    ports:
      - "127.0.0.1:8969:8000"
    volumes:
      - ./data/speaches:/home/ubuntu/.cache/huggingface/hub
    restart: unless-stopped
Save it as docker-compose.yml in the folder from Step 1. user: root on the database comes from the official file: without it, SurrealDB cannot write to a Linux bind mount.
Linux#
cd ~/docker_volumes/open-notebook
nano docker-compose.yml
Paste the file, save, and close.
Windows (PowerShell)#
Set-Location "$HOME\docker_volumes\open-notebook"
notepad docker-compose.yml
Click Yes to create the file, paste, and save. Keep the file name exactly docker-compose.yml, with no .txt added.
Mac (Terminal)#
Same as Linux, or use open -e docker-compose.yml after touch docker-compose.yml.
Check it worked. The file parses and shows your secrets filled in:
docker compose config --services
You should see surrealdb and open_notebook; Ollama and Speaches stay hidden until Steps 5 and 6. A missing .env value stops with a "Set ... in .env" message, which is what we want.
Tip: Compose reads
.envfrom the folder you run it in. Run everydocker composecommand from~/docker_volumes/open-notebook.
Step 3: Start it and check the health#
Linux#
cd ~/docker_volumes/open-notebook
docker compose up -d
docker compose ps
curl -s http://localhost:5055/health
Windows (PowerShell)#
Set-Location "$HOME\docker_volumes\open-notebook"
docker compose up -d
docker compose ps
curl.exe -s http://localhost:5055/health
Mac (Terminal)#
Same commands as Linux.
Check it worked. The docs say to wait 15 to 20 seconds on the first start. docker compose ps lists open-notebook and open-notebook-db as running. The health call returns the text below (taken from the source at v1.15.0, not from our run):
{"status":"healthy"}
Two docs pages show {"status":"ok"}; the code at v1.15.0 returns healthy. Either way, you want an answer.
Step 4: Open it, add an AI provider, ask a question#
Linux#
Open http://localhost:8502 in a browser and enter the OPEN_NOTEBOOK_PASSWORD from .env.
Windows (PowerShell)#
Same address. To copy the password: (Get-Content .env | Select-String '^OPEN_NOTEBOOK_PASSWORD=').Line.
Mac (Terminal)#
Same address. To copy the password: grep '^OPEN_NOTEBOOK_PASSWORD=' .env.
Then add one AI provider (the official flow, the same everywhere):
- Go to Manage, then Models, and click Add Credential.
- Choose a provider (OpenAI, Anthropic, Google, Groq and others), give it a name, paste the API key, and click Save.
- Click Test Connection, then Discover Models, then Register Models.
- Under default model assignments, choose a language model and an embedding model. "Auto-Assign Defaults" exists, but check what it picked.
- Click New Notebook, add a source (a text paste is enough), then ask a question in the chat column.
Check it worked. The test shows success, the source turns ready, and the chat answers using your text. Want it fully local? Do Step 5 instead of adding a cloud key.
Tip: Chat needs a language model and search needs an embedding model. Anthropic, Groq and DeepSeek have no embeddings in the project's matrix: pair them with another provider or Ollama.
Step 5: Run the models locally with Ollama (optional)#
This adds an Ollama container to the same Compose project, so Open Notebook reaches it at http://ollama:11434. CPU-only answers are slow. Our Ollama guide covers installing it on the host instead.
Linux#
cd ~/docker_volumes/open-notebook
echo 'COMPOSE_PROFILES=ollama' >> .env
docker compose up -d
docker compose exec ollama ollama pull nomic-embed-text
docker compose exec ollama ollama pull mistral
docker compose exec ollama ollama list
For an NVIDIA GPU, install the NVIDIA Container Toolkit (see the Ollama Docker page) and add this under the ollama service, as in the Open Notebook docs:
    deploy:
      resources:
        reservations:
          devices:
            - driver: nvidia
              count: 1
              capabilities: [gpu]
Windows (PowerShell)#
Set-Location "$HOME\docker_volumes\open-notebook"
Add-Content -Path .env -Value "COMPOSE_PROFILES=ollama" -Encoding ascii
docker compose up -d
docker compose exec ollama ollama pull nomic-embed-text
docker compose exec ollama ollama pull mistral
docker compose exec ollama ollama list
Mac (Terminal)#
The Ollama Docker page covers CPU, NVIDIA and AMD only. For speed on Apple Silicon, install the Ollama app on the Mac and use the base URL http://host.docker.internal:11434 below. To stay in Docker, use the Linux commands.
mistral and nomic-embed-text are the models the official local quick start pulls; pick a newer chat model from the Ollama library if you like, but avoid "thinking" models for podcasts.
Then in the web page: Manage, Models, Add Credential, provider Ollama, base URL http://ollama:11434, Save, Test Connection, Discover Models, Register Models. Set the language model to your chat model and the embedding model to nomic-embed-text.
Check it worked. ollama list shows both models, the Ollama test succeeds, and a chat reply comes back. A long wait is normal.
Tip: Never use
http://localhost:11434inside Open Notebook: in a container,localhostis the container itself.
Step 6: Give podcasts a local voice with Speaches (optional)#
A podcast is a script plus a voice. A chat model writes the script; a text-to-speech model reads it, and Ollama has none. Speaches is an OpenAI-compatible server that runs the Kokoro voice model on a CPU. Our Speaches guide covers its speech-to-text side.
Linux#
cd ~/docker_volumes/open-notebook
sed -i 's/^COMPOSE_PROFILES=.*/COMPOSE_PROFILES=ollama,speaches/' .env
grep COMPOSE_PROFILES .env
docker compose up -d
docker compose exec speaches uv tool run speaches-cli model download speaches-ai/Kokoro-82M-v1.0-ONNX
If you skipped Step 5, add the line first: echo 'COMPOSE_PROFILES=speaches' >> .env.
Windows (PowerShell)#
Set-Location "$HOME\docker_volumes\open-notebook"
(Get-Content .env) -replace '^COMPOSE_PROFILES=.*', 'COMPOSE_PROFILES=ollama,speaches' | Set-Content .env -Encoding ascii
Select-String COMPOSE_PROFILES .env
docker compose up -d
docker compose exec speaches uv tool run speaches-cli model download speaches-ai/Kokoro-82M-v1.0-ONNX
If you skipped Step 5, add the line first: Add-Content .env "COMPOSE_PROFILES=speaches" -Encoding ascii.
Mac (Terminal)#
cd ~/docker_volumes/open-notebook
sed -i '' 's/^COMPOSE_PROFILES=.*/COMPOSE_PROFILES=ollama,speaches/' .env
grep COMPOSE_PROFILES .env
docker compose up -d
docker compose exec speaches uv tool run speaches-cli model download speaches-ai/Kokoro-82M-v1.0-ONNX
The download command is from the official examples/docker-compose-full-local.yml; we did not run it. If it fails, the Speaches v0.8.3 docs use uvx speaches-cli model download ... from outside the container.
In the web page: Manage, Models, Add Credential, provider OpenAI-Compatible, base URL http://speaches:8000/v1 (the container name works on the shared Compose network; the official docs use http://host.docker.internal:8969/v1 for a separate Speaches), any text as the API key if asked, Save, Test Connection. Then add a text-to-speech model named speaches-ai/Kokoro-82M-v1.0-ONNX with provider openai_compatible.
Finally open Podcasts, edit a speaker profile and set its voice model to that model with a voice such as af_bella (from the official local TTS page). Generate a short episode from one or two sources.
Check it worked. The Test Connection succeeds, and in Open Notebook the episode goes from pending to complete, with an MP3 to play. To test the voice server alone, send a request to http://localhost:8969/v1/audio/speech as shown on the official local TTS page.
Tip: The speaker profile, not the "Default Text-to-Speech Model" setting, decides the voice (issue #1467, open in October 2026).
Put it behind HTTPS (with or without Traefik)#
Open Notebook's password travels in clear text over HTTP, so anything beyond localhost needs HTTPS (official security page). This section is for a server with a domain or a home name; local-only users can skip it.
Both routes proxy only port 8502; the app forwards /api calls to 5055 itself. Both change open_notebook the same way: remove its ports: lines, join the external proxy network, and set its public address. Create the network once:
docker network create proxy
Edit open_notebook in docker-compose.yml like this (keep the other lines), and add the networks: block at the bottom of the file:
  open_notebook:
    environment:
      - API_URL=https://notebook.<your-domain>
      - CORS_ORIGINS=https://notebook.<your-domain>
    networks:
      - default
      - proxy

networks:
  proxy:
    external: true
API_URL is the public address with https:// and no /api. CORS_ORIGINS limits which sites may call the API; the default accepts all.
With Traefik#
On a server that already runs Traefik v3 with the Docker provider, add labels under open_notebook. This assumes an entrypoint called https; the official example names it websecure, so use yours.
    labels:
      - "traefik.enable=true"
      - "traefik.docker.network=proxy"
      - "traefik.http.routers.open-notebook.rule=Host(`notebook.<your-domain>`)"
      - "traefik.http.routers.open-notebook.entrypoints=https"
      - "traefik.http.routers.open-notebook.tls=true"
      - "traefik.http.services.open-notebook.loadbalancer.server.port=8502"
      - "traefik.http.services.open-notebook.loadbalancer.responseforwarding.flushinterval=100ms"
The official page also suggests longer timeouts for podcasts, in Traefik's static configuration:
serversTransport:
  forwardingTimeouts:
    dialTimeout: 30s
    responseHeaderTimeout: 600s
    idleConnTimeout: 90s
Run docker compose up -d. Check it worked: curl -I https://notebook.<your-domain>/ returns an HTTP status line over HTTPS, and the login page opens with a valid certificate.
Without Traefik: Caddy#
Choose this if you have no Traefik. Caddy gets and renews its own certificates. A public domain gets Let's Encrypt automatically (DNS record to your server, ports 80 and 443 open). At home, tls internal makes Caddy sign a local certificate.
Create the Caddy folder and the Compose file. The image is caddy:2.11.7, the latest release read in October 2026:
mkdir -p ~/docker_volumes/caddy/{data,config}
services:
  caddy:
    image: caddy:2.11.7
    container_name: caddy
    restart: unless-stopped
    ports:
      - "80:80/tcp"
      - "443:443/tcp"
      - "443:443/udp"
    volumes:
      - ./Caddyfile:/etc/caddy/Caddyfile:ro
      - ./data:/data
      - ./config:/config
    networks:
      - proxy

networks:
  proxy:
    external: true
Save that as ~/docker_volumes/caddy/docker-compose.yml. The Caddyfile for a public domain is below. The timeouts are from the Open Notebook proxy page and keep long podcast jobs alive:
notebook.example.com {
    reverse_proxy open-notebook:8502 {
        transport http {
            read_timeout 600s
            write_timeout 600s
        }
    }
}
For a home-only name, add tls internal as the first line inside the block and use a name your devices can resolve (a local DNS record or a hosts-file line):
notebook.home.arpa {
    tls internal
    reverse_proxy open-notebook:8502
}
Caddy reaches the app by container name on the shared proxy network, not localhost. Start both stacks:
cd ~/docker_volumes/caddy && docker compose up -d
cd ~/docker_volumes/open-notebook && docker compose up -d
For tls internal, each device must trust Caddy's root certificate (official Caddy Docker commands). Copy it out on the Docker machine, then trust it on each device:
Linux:
docker compose -f ~/docker_volumes/caddy/docker-compose.yml cp caddy:/data/caddy/pki/authorities/local/root.crt ./root.crt
sudo cp root.crt /usr/local/share/ca-certificates/caddy-root.crt && sudo update-ca-certificates
Windows (PowerShell, as administrator):
certutil -addstore -f "ROOT" "$HOME\root.crt"
Mac (Terminal):
sudo security add-trusted-cert -d -r trustRoot -k /Library/Keychains/System.keychain ./root.crt
Copy root.crt to the Windows or Mac device first. Firefox and Chrome may keep their own trust store; Caddy's docs describe importing root.crt there.
Check it worked. curl -I https://notebook.example.com/ returns an HTTP status over HTTPS; a home name shows a padlock once the root is trusted.
Tip: A certificate error usually means the Caddyfile name differs from the DNS record, or ports 80 and 443 do not reach Caddy.
Security and testing#
Anyone who can open the page can read your notebooks and spend your API credits.
| Control | How |
|---|---|
| Login | OPEN_NOTEBOOK_PASSWORD in .env. Without it authentication is fully off. One shared password, no rate limits |
| Ports | Published on 127.0.0.1 only (Step 2). Never port-forward 8502 or 5055 |
| Encryption key | Protects stored provider keys. Keep it apart from database backups |
.env | chmod 600 .env on Linux and Mac; keep it out of Git |
| HTTPS | Required beyond localhost: HTTP sends the password in plain text |
| Cloud AI | Whatever you ask goes to that provider |
Tests after each change:
cd ~/docker_volumes/open-notebook
docker compose ps
docker compose logs --tail=100 open_notebook
curl -s http://localhost:5055/health
curl -s http://localhost:5055/api/notebooks
The last call should be refused. The security page shows this reply (from the docs, not our run):
{"detail": "Missing authorization header"}
With the password, curl -H "Authorization: Bearer <YOUR_PASSWORD>" http://localhost:5055/api/notebooks returns your notebooks. On Windows, use curl.exe. Paths /health, /docs and /openapi.json need no password.
Local or cloud: who sees your text#
| Job | Runs locally with | Needs a cloud provider if you use |
|---|---|---|
| Chat and notes (language model) | Ollama, LM Studio or any OpenAI-compatible server (vLLM, llama.cpp), oMLX on Apple Silicon | OpenAI, Anthropic, Google, Groq, Mistral, DeepSeek, OpenRouter and others |
| Search (embedding model) | Ollama, oMLX, OpenAI-compatible servers | OpenAI, Google, Mistral, Cohere, Voyage and others. Anthropic, Groq and DeepSeek have none |
| Audio and video sources (speech to text) | Speaches or another OpenAI-compatible server | OpenAI, Google, Groq, ElevenLabs, Deepgram and others |
| Podcast voices (text to speech) | Speaches with Kokoro (Step 6) | OpenAI, Google, ElevenLabs and others. Ollama and Anthropic have none |
Source: the provider matrix in the project README. Fully local means Ollama plus Speaches. Text sent to a cloud provider leaves your machine, and pages added by URL are fetched from the internet. The docs we read describe no telemetry; we did not inspect traffic.
Podcasts: each speaker profile holds a name, a personality and a voice model; a chat model writes the script. Outline and transcript default to 8,192 output tokens, so set Max output tokens in the episode profile below your model's limit if it stops at 4,096. A failed episode shows the provider's error and a Retry button.
Common mistakes#
These come from the official docs' warnings, the GitHub issue tracker, and common AI assistant answers.
| Mistake | Why it happens | Do this instead |
|---|---|---|
| Keeping the shipped placeholder key and no password | The official file sets change-me-to-a-secret-string, opens ports 8502 and 5055 on every interface and has no login. Issue #1475 (open) asks for a warning | Use the .env secrets from Step 1 and keep ports on 127.0.0.1 |
Using v1-latest with pull_policy: always | It is the official default, so a restart can pull a new version. 1.15.0 changed encryption, timeouts and podcast limits | Pin 1.15.0, read the release notes, change the tag yourself |
Resetting the database with docker compose down -v | The docs suggest it, but it removes named volumes only, not the bind-mounted data folder | Back up, stop the stack, then move data/surreal yourself |
Permission denied on the database folder (Linux) | SurrealDB runs as non-root but Docker creates the bind mount as root (issue #409) | Keep user: root on surrealdb, as in Step 2 |
localhost as the Ollama address | In a container, localhost is the container itself (issue #358 thread) | Use http://ollama:11434, or http://host.docker.internal:11434 for Ollama on the host |
| Expecting Ollama to read the podcast aloud | Ollama has no text-to-speech (README matrix) | Add Speaches (Step 6) or a cloud voice, and set it in the speaker profile |
Podcast fails with Invalid json output or {} | The model ignores structured output (issue #211) or spends its token budget thinking (issue #1487, open) | Use a chat model that answers directly |
| Local model stops after 3 minutes | Since 1.15.0 every provider times out after 180 seconds | Set ESPERANTO_LLM_TIMEOUT (release notes example: 420, keep under 600) |
AI assistants: docker compose up api -d, or looking for an api container | Old docs pages and chatbots assume a separate api service. It is open_notebook now | Use docker compose logs open_notebook |
AI assistants: OPENAI_API_KEY in the Compose file | Old guides do this; .env.example calls those variables a deprecated fallback | Add providers in Manage, Models |
AI assistants: docker exec open-notebook-local-ollama-1 ollama pull ... | The name depends on your folder, and the docs example uses another folder | Use docker compose exec ollama ollama pull <model> |
Tip: Before copying a compose file from a forum or chatbot, check the image tag and variable names against the official file at the release you pin.
Tip: After you register models, read the default model assignments. Issue #1473 says "Auto-Assign Defaults" can prefer older models.
Tip: Test a podcast with one short source first, so a failure costs minutes, not an hour of CPU text-to-speech.
Troubleshooting#
| Problem | Solution |
|---|---|
Unable to connect to server. Please check if the API is running. | docker compose ps, then curl -s http://localhost:5055/health. From another device the 127.0.0.1 ports are unreachable: use HTTPS with API_URL |
Failed to send message in chat | Manage, Models: test the credential and check a language model is assigned. Read docker compose logs --tail=100 open_notebook (issues #358 and #411 were a wrong model type or address) |
| Source stays on processing or fails | 1.15.0 shows a failure reason instead of retrying many times. Read it and check the page is reachable |
| Upload fails | The default limit is 100 MB (OPEN_NOTEBOOK_MAX_UPLOAD_SIZE_MB); a proxy has its own limit |
Port is already allocated | Change the host side, for example 127.0.0.1:8503:8502 |
| Podcast stays pending or fails | Read the episode's error, the profile's voice model and docker compose logs --tail=100 speaches |
| Offline machine cannot start a source | Offline use is an open goal (umbrella issue #374). Test with the network off before relying on it |
Failed to create RocksDB directory ... PermissionDenied (issue #409): SurrealDB cannot write to data/surreal. Keep user: root, stop the stack and remove the empty folder it created.
There was a problem with authentication at startup (issue #316, closed): the thread names no cause. Check both services read the same SURREAL_USER and SURREAL_PASSWORD, which the database keeps from its first start.
Speaker profile '...' has no voice model configured: set a text-to-speech model on the profile (Step 6).
Known bugs (open, October 2026)#
- Issue #1509: search is slow on big libraries (one user: 43 to 57 seconds a query, about 4 GB peak memory, 246 sources).
- Issue #1487: thinking models can return an empty transcript.
- Issue #1488: a speaker profile accepts a language model as voice, and the podcast fails late.
- Issue #1531: the image's Node.js needs a security update.
Start with docker compose ps, docker compose logs --tail=200 open_notebook and docker inspect open-notebook.
Updates and backups#
Update. Read the release notes, change the tag in docker-compose.yml, take a backup, then:
cd ~/docker_volumes/open-notebook
docker compose pull
docker compose up -d
docker compose logs --tail=100 open_notebook
Release 1.15.0 added a stronger credential format. Old keys keep working, but versions before 1.15.0 cannot read the new format. After the optional POST /api/credentials/migrate-encryption call, going back needs a backup made before it.
Back up. The docs give no backup procedure, so this is ours: stop the stack, archive the data, start it again. The archive holds your notebooks but not the secrets, and skips the large Ollama and Speaches model folders. Keep .env in your password manager.
Linux#
Save as ~/docker_volumes/open-notebook/backup.sh:
#!/bin/sh
cd ~/docker_volumes/open-notebook || exit 1
docker compose down
mkdir -p backups
tar -czf "backups/open-notebook-$(date +%F).tar.gz" --exclude=data/ollama --exclude=data/speaches data docker-compose.yml
chmod 600 backups/open-notebook-*.tar.gz
docker compose up -d
Make it runnable and schedule it at 03:00:
chmod +x ~/docker_volumes/open-notebook/backup.sh
( crontab -l 2>/dev/null; echo "0 3 * * * $HOME/docker_volumes/open-notebook/backup.sh" ) | crontab -
Windows (PowerShell)#
Save as $HOME\docker_volumes\open-notebook\backup.ps1:
Set-Location "$HOME\docker_volumes\open-notebook"
docker compose down
New-Item -ItemType Directory -Force backups | Out-Null
tar -czf "backups\open-notebook-$(Get-Date -Format yyyy-MM-dd).tar.gz" --exclude=data/ollama --exclude=data/speaches data docker-compose.yml
docker compose up -d
Schedule it at 03:00 with Task Scheduler:
schtasks /Create /SC DAILY /ST 03:00 /TN "OpenNotebookBackup" /TR "powershell -NoProfile -ExecutionPolicy Bypass -File $HOME\docker_volumes\open-notebook\backup.ps1"
Mac (Terminal)#
Same script and cron line as Linux.
Restore test. Unpack one archive into a new empty folder, never over the live one, and check the data is there:
mkdir -p /tmp/restore-test && tar -xzf ~/docker_volumes/open-notebook/backups/open-notebook-<date>.tar.gz -C /tmp/restore-test
ls /tmp/restore-test/data
On Windows, use $env:TEMP\restore-test and Get-ChildItem. For off-site copies, see our restic guide.
Performance and resources#
The docs publish no measured RAM or CPU for the app. Measure yours with docker stats --no-stream. Knobs from the environment reference:
OPEN_NOTEBOOK_WORKER_MAX_TASKS(default 5): background jobs at once. Use1for one local model.OPEN_NOTEBOOK_EMBEDDING_BATCH_SIZE(default 50): the docs recommend8for CPU-only setups.ESPERANTO_LLM_TIMEOUT(180 s),ESPERANTO_TTS_TIMEOUT(300 s),API_CLIENT_TIMEOUT(300 s): the page says keep the model timeout below the client timeout, so raise both together. We did not test the pair.- Ollama context defaults to 8,192 tokens; raise it on the Ollama credential if you have memory.
- Vector search scans every chunk today (issue #1509), so big libraries search slowly and use more database memory.
Local text-to-speech on a CPU is the slowest part of a podcast.
FAQ#
Is Open Notebook free? Yes, under the MIT licence. Cloud providers charge for their own use; Ollama and Speaches cost only electricity.
Is it really private? Your database and files stay on your machine. Text sent to a cloud model leaves it. For nothing to leave, use Ollama plus Speaches.
Does it work offline? Local models and voices work offline once downloaded, but full offline use is an open project goal (issue #374). Test it yourself.
Can several people use it? Not with separate accounts: one shared password. Multi-user support is an open issue (#712).
What else is like it? See AnythingLLM, Open WebUI and RAGFlow.
Sources#
- Open Notebook release v1.15.0, README, docker-compose.yml, .env.example and LICENSE - read October 2026
- Official docs at v1.15.0: installation, local quick start, providers, local text-to-speech, security, reverse proxy, environment reference, creating podcasts, full local example - read October 2026
- Open Notebook image on Docker Hub (tag
1.15.0checked); SurrealDBv2.7.0; Ollama 0.40.13; Speaches 0.8.3 - October 2026 - Caddy release v2.11.7, Caddy automatic HTTPS, running Caddy with Docker and tls directive - read October 2026
- Docker Compose profiles - read October 2026
- GitHub issues #211, #264, #274, #316, #358, #374, #409, #411, #712, #1467, #1473, #1475, #1487, #1488, #1509, #1531 - read October 2026
Checked against the official docs on 2026-10-31.